Google Email Groups – Pros & Cons
If you've ever wished for a solution to the unruly WhatsApp and Skype groups that seem to thrive on mayhem, then Google email groups are your beacon of hope.

Last updated: October 27, 2023
8 mins read
In an era where messaging platforms often devolve into a chaotic free-for-all, finding a structured and organized space for productive discussions can feel like an elusive dream.
If you’ve ever wished for a solution to the unruly WhatsApp and Skype groups that seem to thrive on mayhem, then Google email groups are your beacon of hope.
In this article, we will show you how to change how you handle group communication. No more sifting through countless group messages or struggling to find important information in a sea of emojis and GIFs.
What are Google Groups?
Google Groups, often called “Google Email Groups,” are digital mailing lists designed to simplify communication and send messages to multiple recipients. They are a practical tool for sending emails to a designated group of individuals using a single email address.
For instance, imagine you need to coordinate a project with a team of colleagues or keep your family updated on important news. Instead of manually entering each email address whenever you want to send a message, you can create a Google Email Group with all the necessary recipients. This way, when you send an email to the whole Gmail group, it’s instantly delivered to everyone on your list.
Google Email Groups are not limited to personal use; they are also invaluable in professional settings. They enhance efficiency, ensuring that everyone involved receives pertinent information simultaneously. Whether you’re managing work teams, hobby clubs, or any other group, Google Email Groups offer a practical solution to streamline communication and save time.
Step-by-step guide on creating a Google email group
Here is a step-by-step guide on how to create a Google email group:
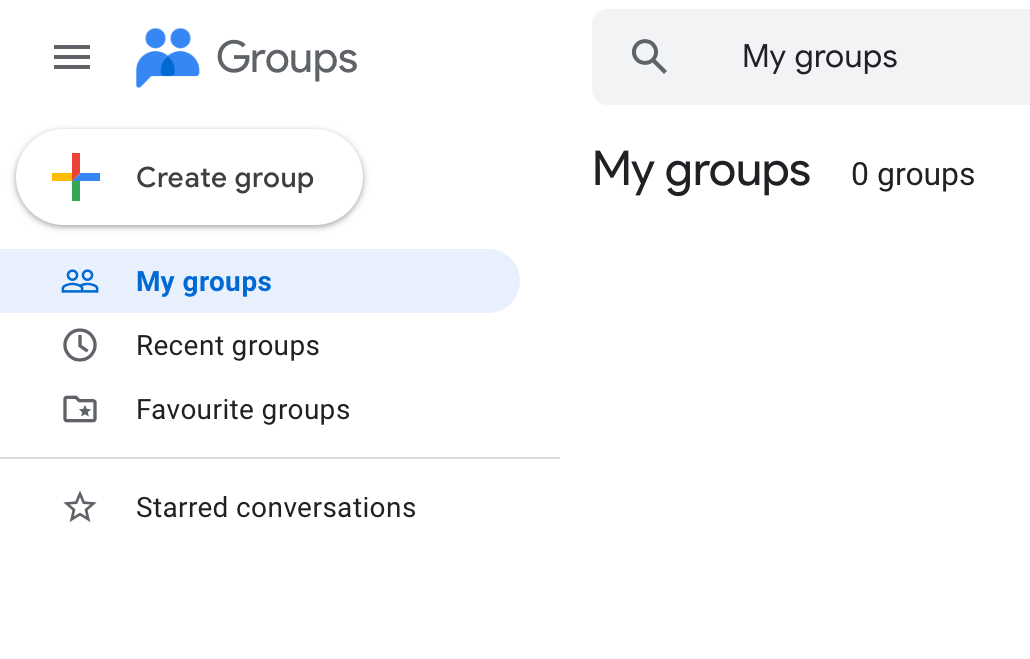
Sign in to Google Groups:
Open your web browser and go to Google Groups. Sign in with your Google account if you still need to log in.
Click “Create Group”:
On the left-hand side, you’ll see a menu. Click “Create new group here” to start the group creation process.
Choose Group Type:
You’ll be asked to choose the type of group you want to create. For creating an email distribution list, select “Email list.”
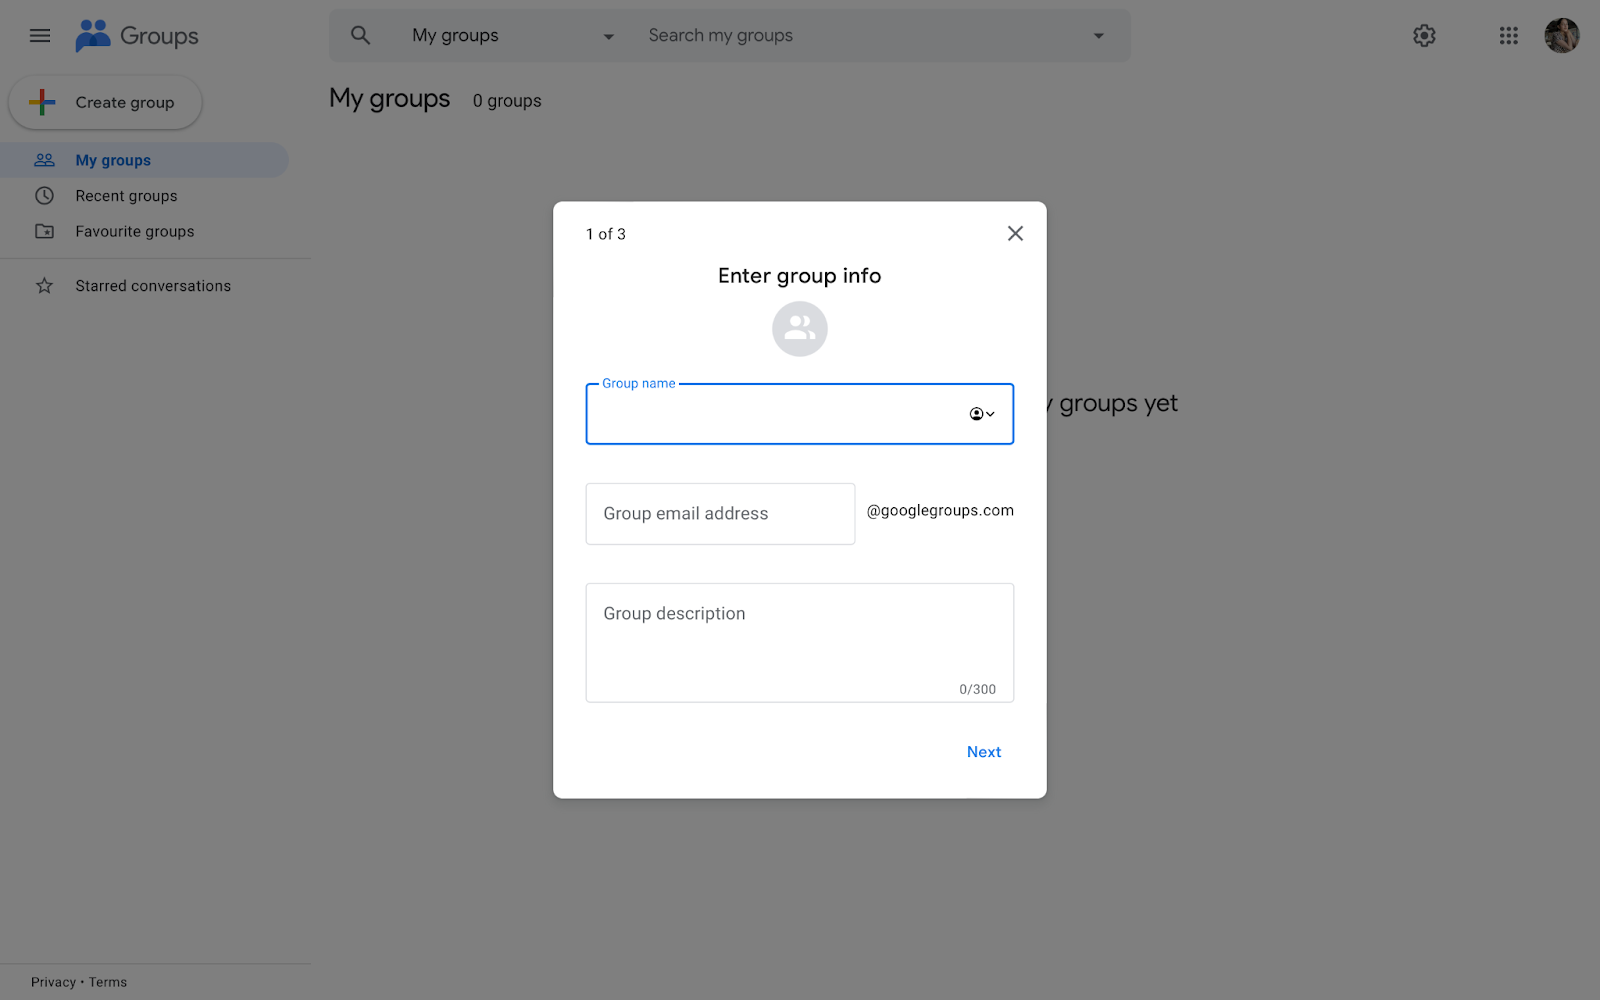
Group Name and Description:
Fill in the required information:
Group name: Choose a name for your group (e.g., “Marketing Team” or “Family Email Group”).
Group email address: This will be the email address people use to send emails to the group (e.g., marketing-team@googlegroups.com).
Group description: Provide a brief description of the group’s purpose or topic.
Group Access Settings:
Choose the access settings for your group:
Who can join: Decide whether anyone can join the group, or if you want to restrict it to new group members you invite or people with a Google account.
Who can post: Determine who can send emails to the group. You can allow any group member to post, only members, or only managers.
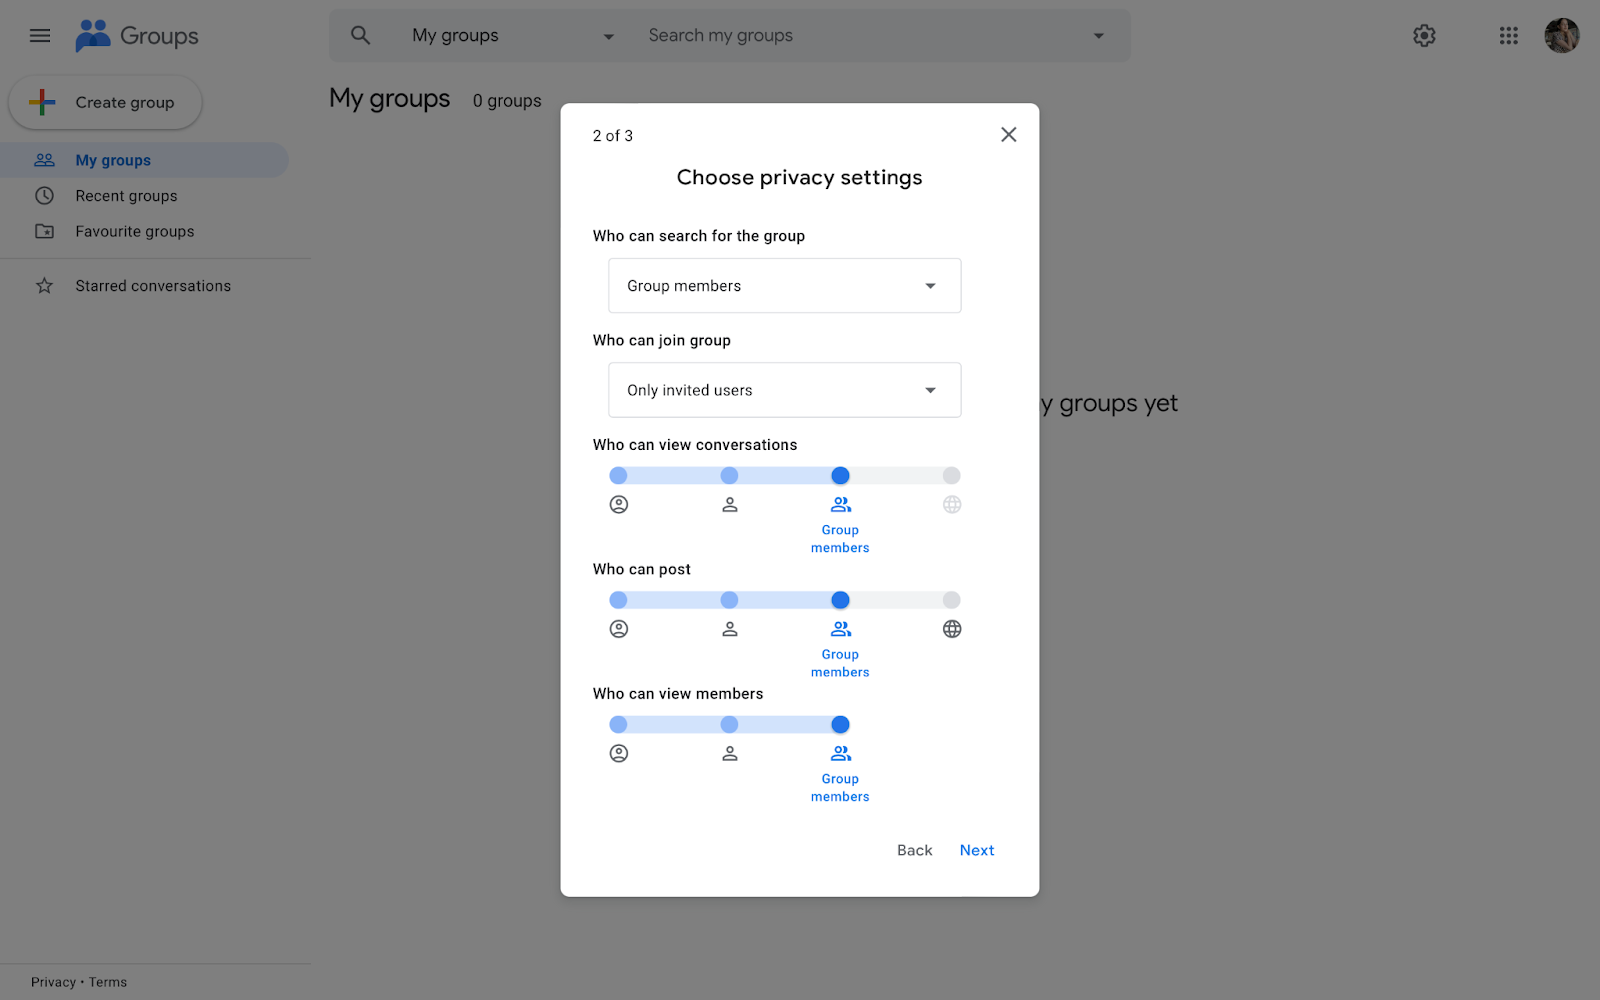
Configure Permissions:
You can set permissions for members and decide whether they can view topics, post, or invite others. You can also customize these settings later if needed.
Advanced Permissions (Optional):
If you need more granular control over permissions, you can configure advanced permissions. Otherwise, you can skip this step.
Read More: Your Ultimate Guide to Google Groups Email
Customize Group Settings:
Configure additional settings such as moderation options, email delivery preferences, and more according to your needs.
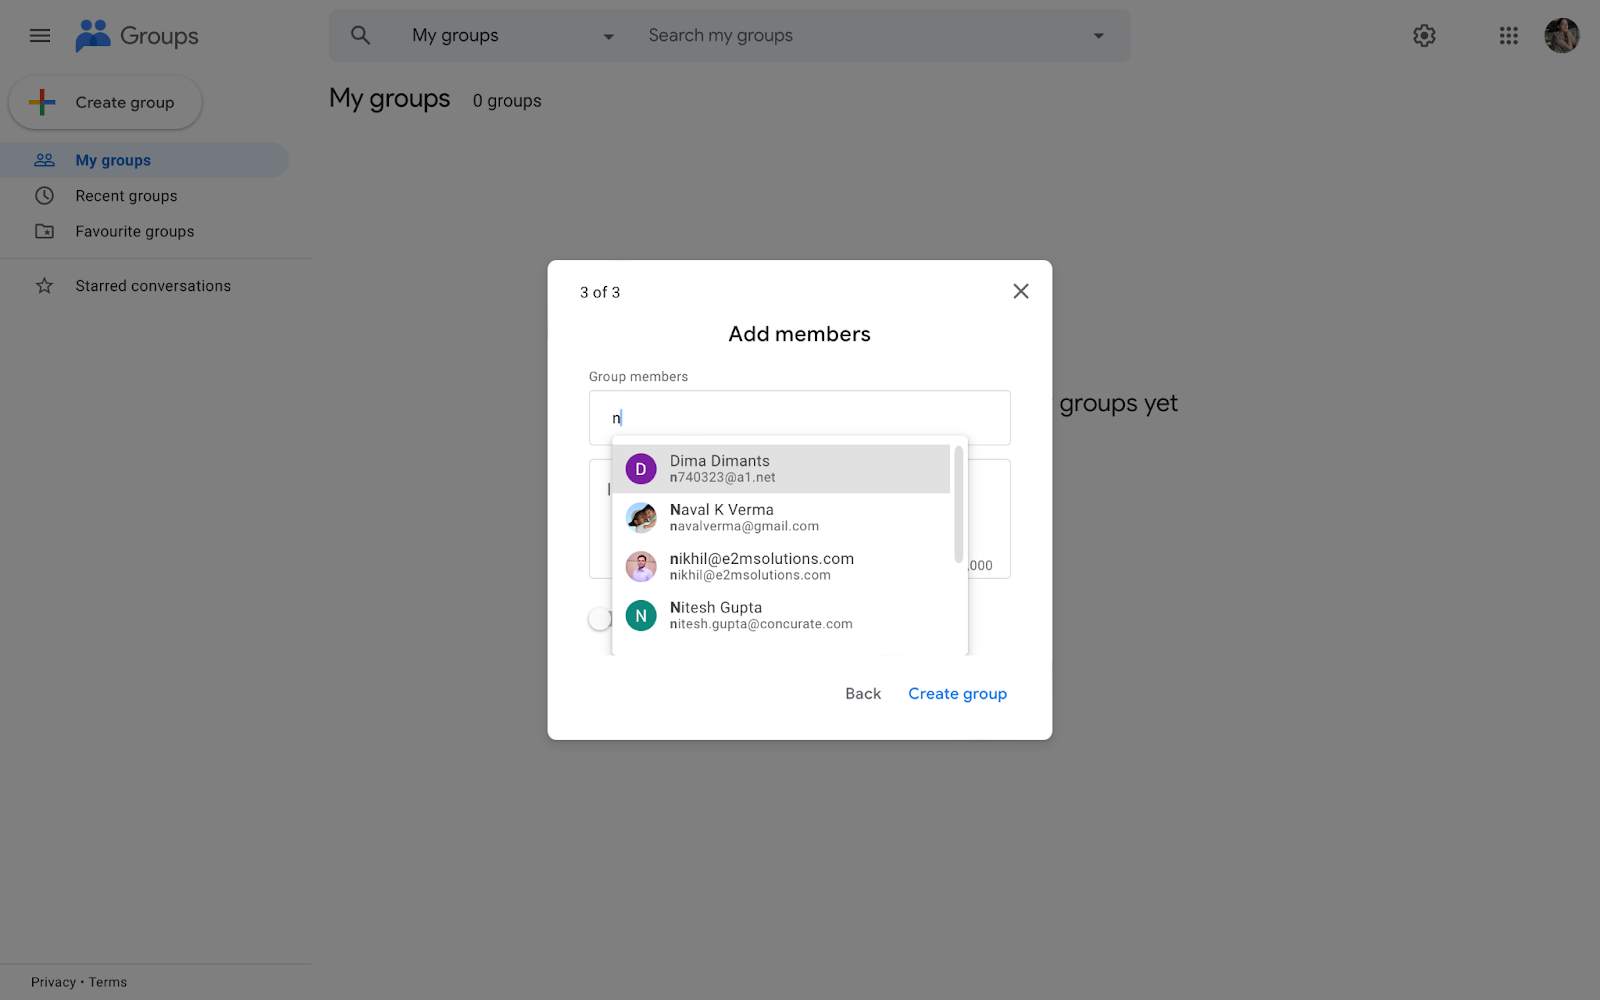
Add Members:
After setting up your group, you can now click group settings start adding members. You can do this by entering their email addresses in the “Members” section.
Review and Create:
Review all your settings to ensure they’re correct. Make sure the google group name, email address, and access settings are as you want them.
Create Group:
Once you’re satisfied with your settings, click the “Create” button to create your Google email group.
Welcome Message (Optional):
You can choose to send a welcome message to new members. This message will be sent to external membersautomatically when they join the group.
Your Google group is now created, and you can start using it to send and receive emails within the group. Members can send emails to the group’s email address, and those emails will be distributed to all group members according to the posting policies and access settings you configured.
How to add/remove members
Creating a Google group is the first step. Later on, you might need to add or delete members from google contacts inthe group as well. Here is how you can do that:
Adding people to your email groups
There are three ways in which you can add members to an existing Google group:
Send an email invitation to someone
Include someone without seeking their prior approval.
Accept individuals who have requested to join.
Sending an email invitation
To start, select an existing group in your Google groups.
Go to Manage > Members.
Near the bottom, locate the option labeled “Add members” and click on it to disable it.
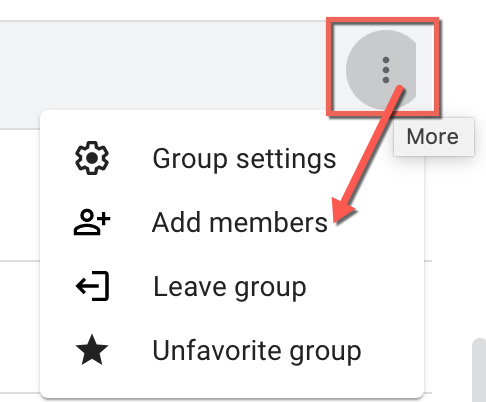
Input the email addresses of the people you wish to invite.
Note: Invites sent to a recipient expire after 7 days.
Include someone without seeking their prior approval
This one is rather simple. Simply click on “Members” in the Google group. Enter the email addresses of people you wish to add. The group member has now been added!
Managing requests to join the group
Log in to your Google Groups account.
Select the group by clicking its name.
Go to “Pending members” on the left sidebar.
Take one of the following actions:
– To grant approval for a single request, click “Approve request” on the right side of the request.
– To decline a single request, click “Reject request” on the right side of the request.
– To accept or reject multiple join requests, check the boxes next to the requests and then, above the list on the right, click “Approve request” or “Reject request.”
Tips for efficiently using Google email groups
Google groups can streamline productivity, bring a fresh perspective for working and enable easy flow of conversations when used properly. While Google groups are simple to use, here are some tips for more efficient use.
Organize discussions with categories or labels
In any active email group, the volume of messages can quickly become overwhelming, making it challenging to sift through conversations and locate the information you need.
Categorization aids in quickly identifying message topics, simplifying searches, and preserving a clutter-free inbox.
Clearly defined categories prevent off-topic posts, promoting focused and relevant discussions.
Members can engage with topics of personal interest, enhancing participation and relevance.
Start by defining the categories that make sense for your group. Consider the primary themes or subjects your group covers and create corresponding categories. For example, a project management group might have categories like “General Discussions,” “Resource Sharing,” and “Technical Issues.”
Actively monitor and manage group membership
Effective management of your Google Email Group involves consistent monitoring and active membership management. Regularly reviewing and purging inactive or irrelevant members ensures that your group remains a vibrant and focused community.
Communicate your membership management policies clearly to group members, so they understand the criteria and process.
Continuously refine your membership management strategy to adapt to changing group dynamics.
How to Monitor and Manage Group Membership:
Regular Reviews: Set a schedule for reviewing your member list. Consider quarterly or semi-annual assessments.
Inactivity Criteria: Define clear criteria for identifying inactive members. This might include no contributions or logins for a certain period.
Communication: Before removal, attempt to re-engage inactive members with personalized messages or reminders.
Active members contribute to meaningful discussions, fostering a dynamic group environment. Removing inactive or irrelevant members prevents dilution of content quality. By managing membership, you allocate resources more efficiently, focusing on those who genuinely benefit from group participation.
Include personalization in the group
Customizing communication within a Google Email Group is essential for engagement and relevance. However, it’s crucial to strike a balance by personalizing content to suit the group’s collective interests and needs rather than catering to individual preferences.
Understand the shared interests, goals, and challenges of your group members. This forms the foundation for group-level personalization.
Create content that resonates with a larger segment of the group. Focus on topics, themes, and discussions that have broad relevance.
Prompt group members to participate in discussions, share their expertise, and contribute to group objectives, fostering a sense of community.
Focusing on group-level interests ensures that discussions and content align with the primary purpose and objectives of the Google Email Group. This helps prevent irrelevant or off-topic discussions.Personalizing for the collective ensures that all group members feel involved and valued, reducing the risk of alienating certain individuals with overly personalized content.
Use group settings effectively
Optimizing the functionality of your Google Email Group hinges on your ability to navigate and leverage its various settings and options.
Understanding and using group settings effectively empowers you to control access, membership, posting privileges, and more, ensuring that the group operates according to your desired parameters. Moreover, group settings provide a level of customization that allows you to adapt the group’s functionality to match its unique objectives and requirements.
Read More: The Best Google Groups Alternatives
Key Group Settings and How to Use Them:
Membership Approval: Choose between open membership, where anyone can join, or restricted membership, where you approve new members. This helps you control who becomes a part of the group.
Posting Permissions: Specify who can post messages, whether it’s all members, moderators, or a select few. This setting prevents spam and ensures relevant content.
Notification Options: Customize how and when members receive notifications to avoid overwhelming their inboxes.
Archiving: Choose whether discussions should be archived for future reference. Archiving is helpful for preserving important conversations.
Moderation: Enable message moderation to review and approve posts before they appear in the group.
Periodically review and update group settings to ensure they align with the evolving needs of the group.
Challenges of using Google groups
Using Google groups comes with multiple challenges. Since many important features are not available with Google groups, it might start feeling outdated. Here are some key challenges of using Google groups:
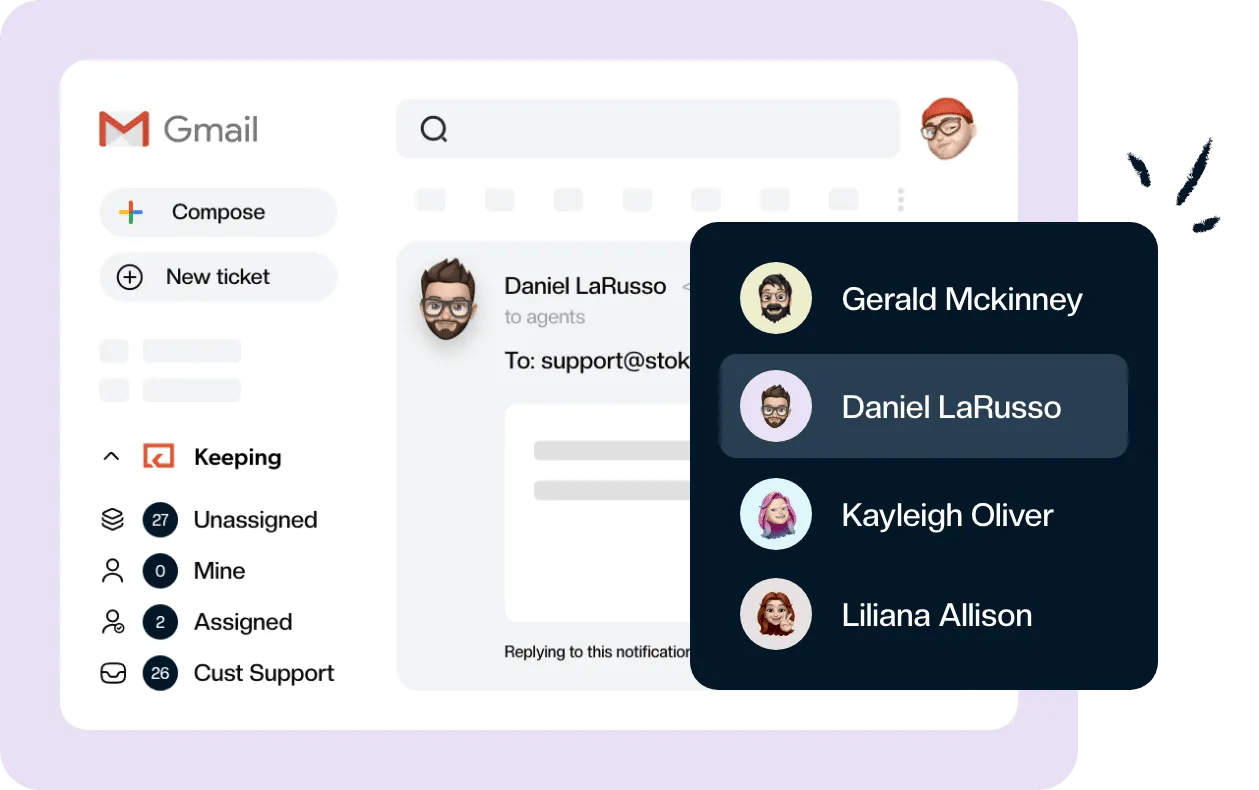
Does not work inside Gmail
Google groups need to be accessed separately and do not work inside your Gmail inbox. This means that you have to manage both Gmail inbox as well as a Google group.
Whereas, a software like Keeping works right inside of Gmail. When you use Keeping, you won’t have to juggle between the Google apps, groups and Gmail. You can simply keep the efficiency flowing with Keeping!
Limited ticketing and tracking in Google groups
Google Groups primarily functions as an email-based discussion platform, lacking the robust ticketing and tracking features necessary for efficient support operations. Managing support requests in a conversational email thread format can quickly become disorganized, making it challenging to prioritize, assign, and track the status of customer inquiries.
Keeping offers dedicated ticketing systems that enable support teams to create, assign, and track support requests with ease. Each support request is converted into a structured ticket, complete with relevant details, priority levels, and status updates.
Lack of automation within Google groups
Google Groups relies heavily on manual processes for managing support inquiries. Automation, such as assigning tickets to specific agents based on criteria, sending automated notifications to customers, or escalating issues, is not a built-in feature.
This manual approach can lead to delays, increased response times, and a higher risk of human error. Keeping is designed to automate repetitive tasks, ensuring that support processes run smoothly and efficiently.
Limited reporting and analytics in Google groups
Google Groups provides minimal reporting and analytics capabilities, making it challenging to gain insights into support performance.
Tracking metrics such as response times, resolution rates, customer satisfaction, and trending support topics becomes a manual and time-consuming process. Keeping offers advanced reporting and analytics tools that provide in-depth insights into support operations.
It’s simple. Keeping is the perfect solution for small customer service teams still using Google groups. Keeping comes power packed with just the right features you need to boost productivity and bring the desired results. Check out what all Keeping has to offer now!
Sanjana Sankhyan is a freelance writer who specializes in delivering data-driven blog posts for B2B SaaS brands. She helps businesses attract more audience and sales with her writing. If not writing, you’ll find her helping other freelancers improve their work. Find her on LinkedIn or Twitter.
Join 150+ teams that are sharing inboxes with us
The easiest way to upgrade your shared Gmail account. There’s no credit card is required.

The Missing Shared Inbox for Google Workspace